Ginger is one of the most versatile and valuable ingredients in every kitchen. From adding flavor to meals and teas to boosting immunity and aiding digestion, fresh ginger is truly indispensable. But what happens when your supply runs out just when you need it the most? Instead of constantly buying ginger from stores—which may not always be fresh or chemical-free—you can grow ginger at home and ensure your family never runs out. This guide will walk you through everything you need to know to successfully grow ginger indoors or in your backyard, producing fresh, aromatic, and healthy roots year-round.
Why Growing Ginger at Home Is Worth It
Growing ginger at home offers several remarkable benefits:
- Year-Round Supply: Unlike seasonal vegetables, ginger can be harvested continuously if grown properly.
- Chemical-Free Produce: Store-bought ginger may contain preservatives or pesticides, but homegrown ginger is naturally safe.
- Cost-Effective: One small rhizome can produce multiple harvests, saving money over time.
- Health Benefits: Fresh ginger contains more active compounds than dried or packaged versions, improving digestion, immunity, and inflammation management.
- Sustainable and Fun: Growing ginger is an enjoyable project for families, encouraging sustainable living and a connection to nature.
Understanding Ginger and Its Growing Conditions
Ginger is a tropical plant that grows from rhizomes—the thick, knobby roots you see in grocery stores. Unlike seeds, ginger grows best when you plant healthy rhizome segments. The key to successful cultivation is replicating its natural tropical environment:
- Temperature: Ginger thrives in warm climates between 20°C and 30°C.
- Sunlight: It prefers indirect sunlight or partial shade; too much direct sun can scorch the leaves.
- Soil: Well-draining, fertile, and loamy soil with high organic matter ensures healthy root development.
- Watering: Ginger likes consistent moisture but not waterlogged soil. Overwatering can cause root rot.
- Space: Ginger needs shallow but wide containers if grown indoors, allowing rhizomes to spread horizontally.
Selecting the Right Ginger Rhizome
The first step in growing ginger at home is selecting the right planting material. Here’s how to choose the best ginger rhizomes:
- Freshness: Choose plump, firm, and healthy rhizomes with shiny skin and visible growth buds (“eyes”).
- Disease-Free: Avoid rhizomes that are shriveled, moldy, or soft.
- Organic Preference: Organic ginger is preferable, as it’s less likely to carry chemical residues.
- Varieties: Common types for home growing include Indian ginger, Chinese ginger, or Japanese ginger. Choose based on flavor preference.
Before planting, soak the rhizomes in water for a few hours to hydrate them, and optionally, dust with neem powder to prevent fungal infections.
Preparing the Planting Container and Soil
If you’re growing ginger at home, container gardening is ideal. Here’s what you’ll need:
- Container: Wide and shallow pots or trays (minimum 12–18 inches in diameter, 6–10 inches deep) with drainage holes.
- Soil Mix: Use a combination of garden soil, compost, coco peat, and sand in a 2:2:1:1 ratio for excellent drainage and fertility.
- Fertilizer: Incorporate well-rotted compost or organic manure into the soil to provide slow-release nutrients.
Fill the container with the prepared soil, leaving about two inches of space from the top to prevent overflow when watering.
Planting Ginger at Home Step by Step
- Cutting Rhizomes: If your rhizome is large, cut it into segments, each with at least 1–2 growth buds.
- Planting Depth: Place the rhizome horizontally, buds facing upwards, and cover it with 1–2 inches of soil.
- Spacing: Maintain 4–6 inches between rhizome segments to allow room for growth.
- Watering: Lightly water after planting. Keep the soil moist but not soggy.
- Covering: For faster sprouting, cover the container with a thin cloth to retain warmth and humidity initially.
Care and Maintenance for Thriving Ginger Plants
Watering
Ginger requires consistent moisture. Water when the top inch of soil feels dry. Avoid overwatering to prevent fungal issues.
Sunlight
Place the container in a location with indirect sunlight. Indoors, a bright windowsill works well; outdoors, partial shade is ideal.
Fertilizing
Feed ginger every 4–6 weeks with organic liquid fertilizer or compost tea. Avoid over-fertilizing nitrogen, which can cause excessive leaf growth at the expense of rhizome development.
Mulching
Add a layer of organic mulch such as dried leaves, straw, or coco peat to maintain soil moisture, regulate temperature, and suppress weeds.
Temperature and Humidity
Maintain warmth and moderate humidity. Indoors, ginger thrives near heaters or warm windows during cooler months. Outdoors, protect plants from frost and harsh winds.
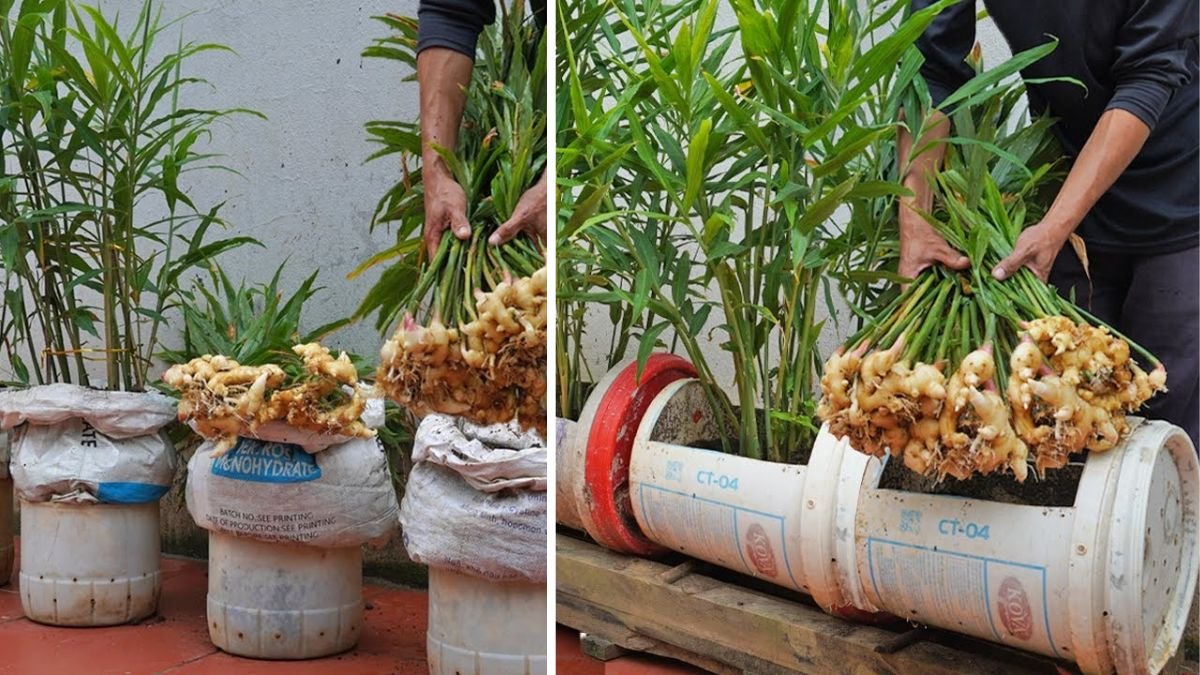
Harvesting Your Homegrown Ginger
The time to harvest depends on the desired size and maturity:
- Young Ginger: For tender, aromatic ginger, harvest after 4–6 months. These roots are great for cooking or making tea.
- Mature Ginger: Full-grown rhizomes can be harvested after 8–10 months. They are thicker, more fibrous, and ideal for storage.
- Method: Loosen the soil gently and lift the entire plant. Cut the rhizomes carefully, leaving some buds in the soil to sprout the next crop.
After harvesting, fresh ginger can be stored in the refrigerator for several weeks or frozen for longer preservation.
Common Challenges and How to Overcome Them
- Yellowing Leaves: Often caused by overwatering or nutrient deficiency. Adjust watering and feed with compost tea.
- Pests: Aphids, spider mites, and nematodes can attack ginger. Neem oil or garlic-chili sprays are effective natural remedies.
- Fungal Diseases: Root rot and leaf spot occur in poorly drained soil. Ensure proper drainage and avoid overhead watering.
- Slow Growth: Can result from cold temperatures, insufficient light, or poor soil. Adjust growing conditions accordingly.
Tips for Continuous Supply
- Stagger Planting: Plant ginger rhizomes every 2–3 months for a continuous harvest.
- Indoor Cultivation: You can grow ginger year-round indoors in warm climates.
- Companion Planting: Grow ginger alongside leafy greens or herbs for efficient space usage and natural pest deterrence.
Benefits of Fresh Homegrown Ginger
Freshly harvested ginger contains higher concentrations of gingerol, the compound responsible for most of its health benefits. Consuming your own ginger regularly can help:
- Boost immunity and fight colds or flu
- Improve digestion and reduce bloating
- Reduce inflammation and joint pain
- Enhance metabolism and aid weight management
- Add rich flavor to cooking without the need for preservatives
Why This Method Works Perfectly for Families
Growing ginger at home is practical, cost-effective, and ensures a steady supply of fresh, healthy roots. By following this method, you can reduce dependence on store-bought ginger, ensure chemical-free produce, and enjoy gardening as a fun family activity.
Even with limited space, a few containers on a balcony, kitchen windowsill, or backyard can produce enough ginger for your household needs all year round.
Final Thoughts
Growing ginger at home is not only rewarding but also a practical solution for families who want fresh, aromatic, and healthy ginger at their fingertips. By selecting healthy rhizomes, using well-draining soil, providing adequate sunlight, and maintaining consistent care, you can cultivate thriving ginger plants indoors or outdoors.
With this method, your family will never run out of ginger again. From cooking delicious meals and making warming teas to enjoying the incredible health benefits, homegrown ginger will become a staple ingredient in your kitchen and a testament to your gardening success. 🌿
Start small, be consistent, and enjoy the sweet satisfaction of harvesting your very own ginger roots, fresh and chemical-free, anytime you need them.